
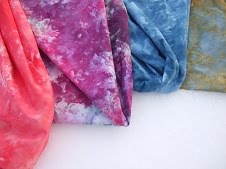
I wanted to use up the rest of the Soy beverage in my fridge so though I would try some more sun dyeing and experiment with the crinkle texture. I dyed 6 fat quarter size pieces of fabric and this time instead of painting on the dye with a foam brush I just put the fabric in the jar, swished them around and then rung them out. I smoothed them out on the plastic and then crinkled them to different amounts.

The first one I crinkled a little and the second one just a bit more.


The third, fourth and fifth fabrics I created deeper crinkles like in this pink one.

The last one I made smooth and threw sand on it to see how that texture would look. I kept adding more sand every ten minutes so it would have a range of pink tones.


And the results...a super cool crinkle effect!!
These pieces are ironed and starched so all the wrinkles are from the dye!

I prefer the smaller crinkle in the blue and purple fabrics as compared to the larger crinkle which has a lot of lighter areas.

The sand texture turned out really nice too but it might be hard to see as it is so light.

I am really lovin this blue piece of fabric and think this the technique could make a very cool quilt backing.


fun stuff! Those lesser-wrinkles really are super, super cool.
ReplyDeleteKathy, you are just so creative and I love reading about all your experiments. I'm glad you decided to try this again and the results look amazing! I can't wait to see what you do with all your creations. :)
ReplyDeleteHey not fair... you had time to do some more sun dyeing... well, I must get to it! This is a hot week ahead for us so out comes my dyes and will give this a go. I have been collecting various natural elements around the yard but definitively will try the crinkle method... really like the purple one! G
ReplyDeleteLove to see all of your dyeing projects!!! I really like the blue one too!
ReplyDeleteUgh, your dyeing is keeping me up at night! I'm getting closer to getting time to start mine. Thanks for the pictures.
ReplyDelete