
I just wouldn’t be right if I ended January without a Snow Dyeing post! I was in a Snow Dyeing mood on Sunday and thought I would take pictures to share the process again. When I made my first Snow Dyeing Tutorial two years ago, which you can see here, I poured the liquid dye onto the snow. I really like that method when the snow is sticky and wet and I want the colors to blend more. But if I want bright bold colours than mixing the dye powder into the snow gives the best results. And this method works best when the snow is dry…meaning it is still in snowflake form, light and fluffy and you can’t make a snowball with it. So if you live in Canada where this type of snow is plentiful in January then your in luck! :)
The first thing I want to show you is my new frames.

I am now using Q-snap frames (used for x-stitch or hand appliqué) instead of my wood frames. I have retired my small wood frames for two reason. First the Q-snaps are easier to clean and I can take off the nylon mesh and give them a good wash. The second was when I laid the wet fabric on the wood frames I would get bleeding from the colors on the wood onto the wet fabric if the fabric touched the wood…which it always does. So I’m very happy with this new system and now have my eyes out for more Q-snap frames in clearance sections when I’m in any hobby shop.
Retired small wood frames.

So now that I’ve shared my new frames here is a reminder how I crumple up my fabric before laying the snow on. Remember the fabric has been pre-soaked in a Soda Ash solution.

Now to the fun part, mixing the dye powder into the snow. I used 4 litre ice cream pails and filled them about 3/4 full with snow. I added about 1 to 2 tsp of dye into each pail. Stir the snow and dye powder well!

Now scoop your colors onto the fabric as high as you can and try not to mix the colours too much. They will blend as the snow melts.
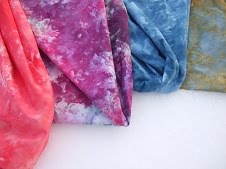
For the first fabric I used Fuchsia, Cerulean Blue and Raspberry and for the second I used Bright Yellow, Orange and Fuchsia.


The third has Bright Yellow, Cerulean Blue and Dark Green. I had to still use one of my wood frames as I only have two Q-snap frames so far. :)

And now the results…


I’m loving these fabrics!!


They are all beautiful, but I love love love the green and blue. Do you have plans for them?
ReplyDeleteKathy - what fabric do you use!. I always wish I lived where there is some snow when I see this...Its too hot here I guess :) Love those fabrics you do.
ReplyDeletevery pretty!
ReplyDeleteKathy -- this is awesome! I just love the fabric and the method is out of this world. I guess I missed your first tutorial! I'm glad you updated..
ReplyDeleteKaren
I love it every time you share these :)
ReplyDeleteThis looks fun! My favorite is the green and blue version. Beautiful!
ReplyDeleteAt first I was like snow dying? What do you do with the dyed snow?! Lo and behold making some marvelous looking dyed fabrics of course!!! Hand dyed fabrics have a special place in my heart;)
ReplyDeleteBeautiful! I am anxiously awaiting another snowfall to try mixing the snow and dye first.
ReplyDeleteJust gorgeous. I love the variety of colours through the fabric.
ReplyDeleteWhat an interesting process! The fabrics are beautiful, but all that snow makes me shiver.
ReplyDeleteKathy
ReplyDeleteIt wouldn't be January without snow dying! Thank you so much for sharing the new Q Frame idea. The three fabrics turned out beautiful! Wow!
We are all loving these fabrics! I'm so sad that I live in Las Vegas...no hope of fluffy snow for me...Just awesome!
ReplyDeleteOK, next time we get snow I want the same kind as you get not the horrible soggy wet kind that we get.....I want nice clean dry snow......
ReplyDeletelovely results Kathy....
Your fabrics are gorgeous! Makes me want to give that snow dyeing yet another chance....
ReplyDeleteGreat idea with excellent results :)
ReplyDeleteKathy, Thank you for sharing your snow dyeing techniques. The Q-frame is such a good idea! All three fabrics look wonderful. Certainly no shortage of snow this winter:-)
ReplyDeleteBeverley
The snow in the Fraser Valley (near Vancouver) is quite unreliable, so I will have to just admire your results and maybe we will get snow next year...
ReplyDeleteI find this so very interesting. great colors.
ReplyDeleteKathy, these have turned out REALLY well. You have inspired me to try again, but can I come play at your house? All of our snow is gone!
ReplyDeleteDye into dry snow! I just may try this as I had about decided I didn't like the snow dyeing. Thanks
ReplyDeleteI love the snow-dyed fabrics. Someday I will try it. It looks like so much fun!
ReplyDeletebeaniekins84(at)gmail(dot)com
Awesome! I'm am so trying this! Thanks for sharing!
ReplyDeleteJust amazing! I was mesmerized the last time you showed this and I am even more mesmerized! This fabric looks like it came from a bolt at quilt store. Wow! They even look like batiks. I'm loving this. Nice work! You have such a talent!
ReplyDeleteI was just sent your link by my BF and I had never heard of snow dying, now I have to so try this, my neighbors already think I'm nuts so now on to prove it. Thanks for sharing, Quebec here has lots of snow I can use lol :-) no shortage if anyone wants some.
ReplyDeleteThat's just gorgeous!!!
ReplyDeleteWonderful informative post! This will have to go on my must-try-soon list.
ReplyDeleteBeautiful...I love all of them. I must try this but we haven't any snow at the moment.
ReplyDeleteCOOL! One of your readers directed me here, I have recently begun experimenting with the dye process and LOVE the effects snow and ice gives....have not tried using screens or mixing the dye into the snow.....gonna HAVE to give it a go.
ReplyDeleteThanks for the wonderful walkthrough
You have such inspirational tutorials in your blog, I'm reading them through now. What a pity I didn't find this earlier - we had a snowful winter here in southern Finland, so there would have been a lot of material for snow dyeing. Maybe next winter...
ReplyDeleteI forgot to say: the results are phenomenal, such rich colours!
ReplyDeleteThese snow dyed fabrics are awesome! Too bad we don't really get snow down here in GA or I would totally try it!
ReplyDeleteKim @ TiesThatBindQuilting
So glad I came back to your site this evening. I have over a foot of brand new snow here in Missouri, and can't get out of my driveway, so I'm going to try snow dyeing. I was going to use your your first tutorial but my snow is light and dry so I will try this method first. Love your fabrics and the beautiful way you display them in the snow. I just put Flin Flon on my list of places I want to go. Do you accept visitors to your studio?
ReplyDelete