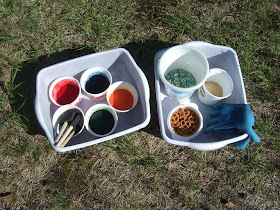
The sun is shining today and I have been waiting patiently all weekend to try some sun resist dyeing using a Soy beverage and MX Procion dyes. The idea behind this method is any items you place on the wet fabric in the sun will create a lighter imagine in the fabric and the background that is in the sun will be darker. Lori sent me a link to some great instructions on this process so you can see how it is suppose to be done :) Harmony Hand Dyes Instructions
Since this was my first time trying this method I definitely learnt a lot! And I'll even share my whoops with you.
Use a Soy beverage as your liquid and mix your MX dyes using the colors you want. I used 1/2 cup warm soy to 1/2 tsp of dye and mixed up four colors to try.
Next I soaked my fabric in a soda ash solution for 15 minutes and then layed them out on some plastic in the sun. I then painted on the dye using foam brushes and once done that add resist items on top of the fabric. I chose rice, glass beads and pretzels.
The next one I painted blue and added the glass beads hoping it will look like bubbles.
Then on the red fabric I added the rice and on the orange fabric I added pretzels...the whole time wondering if added food was a good idea!
I had some paint left over so soaked another piece of fabric and thought I would layer all the colors on one piece without added any resist items. I wanted to see what kind of texture it produces.
I was hoping all the little creases and air bubbles would create an interesting affect with the dye.
Now here is my whoops moment. When I can back out to see if the fabrics were dry I saw this! Darn!
The blue dye has run into the red fabric! Mental note, keep fabrics farther apart.
Once the fabrics were dry I rinsed then in water with TNA soap and then soaked them in Raycafix to fix the dye. Put them in the washing machine on a rinse cycle and then into the dryer.
So now to the results.
I am very happy with these three, minus the blue blob on the red fabric but I was still happy with how the rice worked as a resist. I had to place rocks on the corners of the fabric as it is windy here so that is why the corners are light.
But the green one didn't turn out anything like I was hoping it would...blah! I think I did the crinkle too tight, next time I will make it a lot looser. I was hoping for a grassy textured piece of fabric but that is far from what I got!
Now I was pleasantly surprised how much I like the multicoloured piece.
It has great texture, like a crackle finish, and the colours are a bit cloudy too giving it a soft feel than I wasn't expecting.
I think I might try this method again as I want to get the crinkle method figured out. I'm sure the Soy beverage won't disappear from my fridge any time soon, unlike the rest of the items in it! ;)


Seriously, that is so cool!!! Using the pretzels and rice is a great idea!! Wow, I love how they turned out. Looks like you have the whole operation down to a science!
ReplyDeleteSo very interesting. I can't wait to see them tomorrow. You are bringing them to guild, right? A
ReplyDeleteHi Kathy, I love the fabrics, even the green one! I saw some fabrics once where they put leaves on the fabric. That was beautiful too;) The soy would not vanish from my fridge either ;)
ReplyDeleteGreetings from Germany, Inka
fun! I love the blue, too!
ReplyDeleteVery interesting. Thank you for sharing the process.
ReplyDeleteLove your dyeing results!!! I especially like the rice resist!!
ReplyDeleteI always like to see what you are up to!
Karen H
Kathy those turned out great!
ReplyDeleteMy goodness, Kathy, that is so cool! You really do amazing work and have such fun doing it! ; ) It's always so fun to drop in on your blog and have a wee visit. Always eye candy to admire. ; )
ReplyDeleteLinda C.
Love the blue result after using the glass beads. You really did achieve the look of bubbles. Very watery.
ReplyDeleteSuch fun experiments!