
I've had a few requests for a tutorial on how to do the Curved Echo border design. First I need to clarify that I did not create this design, Raylene Smith shared a pictures of one of her quilts on a quilting forum with this design in the borders. This is one of my favorite border designs and it is surprisingly simple to do.
Here is a picture of Robins quilt, it was the first quilt I tried this design on.

You will need a curved ruler, I don't think it matters what brand as long as it has 1/4" markings along the curve. I use Deloa's Boomerang rulers and what size you use depends on the width of the border and scale you want to create your design at. I will be give directions for quilting this design in the outside border.
First you need to divide up the border into even sections and I like to make it simple and use the center of the sashing as my divisions. Yes the first and last curve sections will be a bit longer depending on the wide of the sashing but you really won't notice that in this design.
If your quilt does not have sashing then measure the inner part of the outside border and divide that evenly. I have used between 9" to 18", it just depends on how wide of a border you have.
Let's say the spacing between the yellow lines is 10". The blue line represent the center of the space and this indicates were to end the curve on the outside edge of the quilt. This will be 5" offset from the yellow marking against the inner border. I like to mark these blue reference lines with chalk on my border.

Next I like to chalk on the main 'Zigzag' of the design using my curved ruler. This is seen by the curved yellow line. At the corners you just take the curve to the outside corner even if the spacing is not the same it doesn't really matter. This is one of the great things about this design is it works so well around corners!
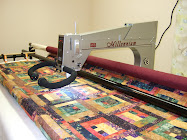
Once the zigzag line is marked it's time to quilt it using your curved ruler.

Once the zigzag is quilted I then fill in the echos and like to use 1" spacing.
Here is a sketch of the same information I drew on the picture above but the curves are drawn the other direction. This is to show you it doesn't matter which way you start to draw your curves just continue this pattern around the whole quilt.

Here is a sketch of the stitch path. I backtrack along the main zigzag, seam line or outside edge so no need for stopping and starting. You can just travel in the seam lines or outside edge to get to the next curve section.

I took this set of pictures when I was working on my Mystery quilt. I wasn't too happy with the quality of these pictures but they show a good example of longer curves, I believe they had an 18" repeat.


Picture of the ruler when stitching the zigzag. I use the lines on the ruler as my guide to create the 1" spacing between the echos.

Here are the curved echoes chalked in to show you the backtracks and the finished border.


I find this design has the best impact when stitched on solid or tone on tone fabrics.
Also I would avoid variegated threads with this design because of the backtracks.


Thank you Kathy for taking the time to share detailed instructions...I copied your border from the pic of robins quilt! I think its a perfect border for both male or female and Very pleasing to the eye! Love your blog and thank you for sharing your wonderful tips!
ReplyDeletethank you so much for the instructions. It is very clear and I am looking forward to trying this. It looks great!
ReplyDeleteGreat tutorial! I don't know if this is the original post that you are looking for but here's the link I have:
ReplyDeletehttp://mqresource.com/forum/index.php?/topic/18049-curved-lines-cross-hatch-variation-border-design/
What a great tutorial, and fabulous design. Maybe some day I'll be brave enough to try it with my machine!!
ReplyDeleteAwesome tutorial!!!! It really gives me a great visual!!! Do you turn the quilt when doing this design? Do you mark all the lines you will stitch or is that just for the tutorial?
ReplyDeleteLinda I do not turn the quilt, it is easy to work down the side with this design. No I do not mark all the lines, just the main zigzag. That was just for the tutorial.
ReplyDeleteThanks for this Kathy. You are awesome!
ReplyDeleteWell written tutorial Kathy. Your pictures make it easy to follow.
ReplyDeleteHi Kathy!
ReplyDeleteThanks for the great instructions!!
This is definitely one border I think I can try, you make it look so easy, and the pictures really help!
Karen H
Hi Kathy, Great quilt, I love this curved border it looks good on many different quilt designs, I find it very easy to accomplish. I am sure you will find that the designer is Raylene Smith from Australia, Raylene first used this quilting design on the sashing of her Kitty Balerina Quilt shown on MQResource. http://mqresource.com/forum/index.php?/topic/16413-kitty-ballerina-quilt/page__fromsearch__1
ReplyDeleteHTH
Best Wishes
Kay in Scotland
Thanks, Kathy for posting the instructions! As always, your quilts are beautiful - I love visiting your site! Happy New Year!
ReplyDeleteThis was great! Thanks for posting it!
ReplyDeleteThanks Kathy, great instructions.
ReplyDeleteginger
Kathy...This is a wonderful tutorial...I was looking at the Star quilt that show here...I like the back ground catherdral windows in the background of the stars. Is that hard to do? Wondering if you draw a grid to follow or just freehand it. Thanks so much.
ReplyDeleteI LOVE how people really like this simple and easy border treatment...I never thought when I quilted the Kitty Ballerina" quilt that this would be the one thing that people liked the most..lolol great tutorial..I originally used Deloa's boomerangs too...it was the applique ballerina in that quilt that made me come up with that in the first place...I was jiggling my hips from side to side when I was trying to come up with an idea on the border next to her...lol...I thankyou for the credit
ReplyDeleteI think I will try to use your instructions for this gorgeous pattern for the border on the quilt I'm about to finish. I'll just have to figure out how to adjust it so it will fit in :-)
ReplyDeleteI usually do not have outside borders any larger than 8" to quilt. What size boomerang ruler would you recommend ? I have her first boomerang ruler which is a little short for a 4.5" border. I am quilting this on a community quilt that has a 4.5" border. So far, it looks nice. Your instructions are very easy to understand. Thank you for sharing this nice border pattern. Shirley
ReplyDeleteShirley, I usually do this on 5" to 6" borders and use my 15" Boomerang but the 12" would probably be good too. It depends on the width of the repeat you are doing as well so if your ruler is too short try a smaller repeat distance along the border.
ReplyDeleteThank you for this tutorial! As a new longarmer I've just started collecting rulers and already have one of DeLoa's boomerangs, the 8 inch one (bought it to see what it was!). Kind of on the small side, but it's start when you don't know what you're doing! I love her rulers and will be buying more, and a bigger boomerang is now on my list to repeat this nice border design!
ReplyDeleteHi Kiathy
ReplyDeleteI'm trying this border tomorrow. Tell me, has Raylene got a blog or a website. I'd like to see more of her work?
Thanks
Linda
Just found this blog on the APQS website! Love, love, love it! Thank you for sharing your talents with us fellow quilters!
ReplyDeleteI'm trying to quilt this border on a quilt, but I'm having trouble and I'm hoping you can help me. I've stitched out my zig-zags and am trying to fill them in. I get the stitching path, but I don't know how to line up my ruler. I'm using the 1/2" line (to get a 3/4" spacing) but the curve line on the ruler doesn't match the curve of the zig-zag. Am I totally crazy? I thought of lining up the 1/2" line with the beginning and ending of the stitching, but that doesn't seem to work!
ReplyDeleteNot all curved rulers are marked the same, some are marked with even 1/4"line and other taper at the ends. Also the outside curve can represent a circle 1" larger than the inside arc of that ruler so the outside curve is not the same as the inside curve. So what I would suggest you do is mark the lines in a few zig zags areas to get a feel for how to hold and use the ruler you have. I usually do a 1" space so that any variation is not that noticeable.
DeleteThank you so much - I actually think I just had to whine a little, then go walk my dog. I'm ready to have another go at it!
DeleteFabulous border treatment. I am keen to try this out as it looks great!
ReplyDeleteI'm learning to do the Westalee rulers/templates for domestic machines. I believe they have some kind of arc similar to this. Your tutorial will come in handy, so thanks very much for sharing. Do you do all your long-arm 'free-hand,' as in it's not computerized? It's amazing work. I rent a long-arm and always choose the computerized version, but am working up my nerve to try some intricate, more hands-on quilting soon. I just need the right quilt for it. I enjoy all your posts.
ReplyDeleteKathy, thank you SO much for this tutorial. You mentioned it in a fairly recent blog post, and it was the perfect choice for a quilt I was finishing! I just posted a picture to the APQS forum. I know this is not your original design, but I made sure I gave you credit for giving me the idea.
ReplyDelete