Tuesday, July 2, 2013

New Quilt Hanger

 hanger

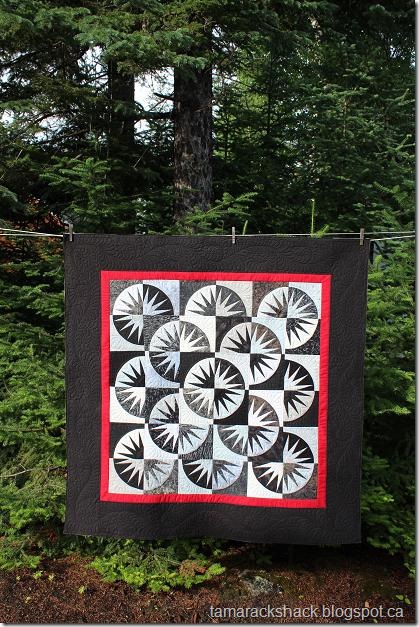
This weekend I asked Tim if he could make me a quilt hanger so I didn’t have to bug him or the boys to hold my quilts for pictures.  I came up with the design and very happy with how it turned out. I wanted it to be able to hold any size quilt up to 100”x 100”.  The nice thing about the spot we put it in is that it is out of the wind unlike the dock, clothesline or deck.

hanger2

When I take pictures you don’t see the side pieces just the border the quilt is clamped too.

hanger3 Here is a picture of the back. There is a 2x6 attached at the bottom of the upright boards and I covered it with rocks to blend in with the rest of the retaining wall.  It is screwed into the large railway ties that are under the rocks and make up the retaining wall, that’s why I put fence boards around it, to cover up the ugly railway ties.

hanger4

The quilt I used to show off my quilt hanger was a guild Mystery project back in 2009 but I have never used this quilt, it has been folded up in the closet for all these years. So I have decided to try to sell it, along with a few more quilts  on Lori’s and my Highway 10 Designs Etsy shop.

Besides this quilt I’ll be selling one of my Isosceles Triangle baby quilts and a large Drunkards path wall hanging.

triangle3 circles2

Saturday, June 29, 2013

Quilts for Alberta Flood Victims

 calgary2

Andrea from Urban Quiltworks had a post on her blog this week about donating quilts to those that lost everything in the Alberta floods.   I thought this was a wonderful idea and asked her where would the best place to send a quilt. She said that The Sewing Room in Calgary is collecting quilts so that is where I’ll be sending my Serenade quilt.   I quilted it yesterday and got the binding on today so it is ready to go.  I’m going to keep it until our next guild meeting and see if the guild and other members have  any quilts they would like to send too.  

calgarycalgary3 calgary4

Friday, June 28, 2013

Island Sunrise #8

 val1

This is Valerie’s Island Sunrise wall hanging and she did her quilt in black, gray and white.  Love the touch of red in the inner border,  really makes the whole quilt shine.  She said I could custom quilt it how ever I liked and since it had a nice wide black border I had to do some curly feathers.

val3val2 val4

The sun is finally trying to shine, we’ve had rain all week and the lake level has risen about 6 inches.  This is the last quilt that needed to be finished for a client before my break for July and August.  We have started our kitchen renovation and also been painting by sons bedroom, my house is a mess!  But a good mess as this will be so worth it in the end for the new kitchen.  I will be quilting and sharing my personal projects over the summer as I know I’ll need to escape to the Shack while work is being done in the kitchen. I might even have another giveaway this summer too :)

val5

Sunday, June 23, 2013

Bargello Bed Runner

diana1

This is Diana’s Bargello bed runner and the pattern is called Southwest Movement designed by Wendy Strumwasse.  She bought the pattern at a quilt shop in Las Vegas called The Fabric Boutique.  I love the colors in this quilt and the fact they are batik fabrics doesn’t hurt!   I quilted free hand swirls using a brown variegated Lava thread across the whole quilt to add texture without taking away from the piecing. It’s been cloudy and rainy here all week with no end in sight.  So I found a dry moment to get some pictures but they don’t show the quilting that well but the colors are very true.

diana3diana2diana5diana4

Friday, June 21, 2013

Curve It Up Top Done!

curve1

Here it is, my Curve It Up quilt top and I finished it before Jenny starts her next Quilt Along! :)   You may have noticed my quilt top does not have the curved sashing design that Jenny created and that I did the ‘no seams’ tutorial on.   I struggled with finding the right fabrics for that design and it just wasn’t working for my quilt top.  So onto plan B, sash the quilt with background fabric, since I dyed 3m of it, and have the blocks float.  I surprised myself when I was shopping for a batik fabric for the outer border.  I picked a few bolts off the shelf and almost put this one back as I thought it wouldn’t look good with the blocks, boy was I wrong, it was perfect!   So always auditions fabrics even when you think they won’t work because sometimes they are exactly the fabric you need. 

curve2 curve4 curve3

I’m really happy with how it looks and it was fun making a quilt with my hand dyed fabrics. I hope to get this one quilted this summer while I’m taking a break from quilting for others.  Only two more to go and then I’m free for the summer!

curve5

Thursday, June 20, 2013

Smokey River King Size Quilt

lorette1

This is Lorette’s Smokey River quilt and she added extra borders to this pattern to make it king size.  You can find the original pattern here.  Lorette is new to longarm quilting and just started a blog called Spruce It Up Quilting.   I just love her business name and am looking forward to following her new adventure.   The reason she sent me her quilt top was that it was too big for her 10’ frame.  This quilt is 109”x109” and it just fit on my 12’ frame.

lorette2 lorette3

I used the panto Fascination, Quilters Dream Blend Batting and medium Gray So Fine thread on top and Gray Bottom Line in the bobbin.

lorette4 lorette5

Wednesday, June 19, 2013

Batik Cobblestone Quilt

phyl3

This is Phyl’s Cobblestone quilt done in bright jewel tone batiks.  She made this quilt for her daughter Laura who just bought her first home.  That is such an exciting time and this quilt will be a wonderful house warming gift from her mom.  I used a bright jewel toned Lava thread and Tickle for the panto design.

phyl1 phyl2phyl4

The backing is a beautiful pink batik and I used matching pink Bottom Line thread in the bobbin.

Monday, June 17, 2013

Ice Dyed Parfait

 parfait1

Last week Lori posted a tutorial on how to dye fabric using ice cubes, it is similar to snow dyeing.   She did a ‘parfait’ which is layering a few fabrics in one jar and using different dyes on each layer. You can see Lori’s instructions here.  I had never tried dyeing a parfait or using ice cubes before so I wanted to give it a try.  The top pictures shows my jar with three layers of fabric.  The bottom layer has Bright Yellow and Cerulean Blue, the second layer has Hot Pink and Bright Yellow and the top layer is Cerulean Blue and Hot Pink.  I used more dye powder then Lori suggested as I wanted dark bright colors, I used about 1 tsp total per layer.  You can see the dye powder on the ice cubes in the next picture.  I also crushed my ice cubes a bit, Tim smashed them with a hammer for me.  I had tried using the blender but it just made slush.

parfait2

I let the ice and fabric sit in the jar overnight.   By morning all the ice had melted and the jar looked like this.

parfait3  parfait4

You can see my excess dye powder on the fabric that didn’t dissolve. I think I would use a bit less dye next time.   Here are the results of my half meter pieces.

parfait5parfait9

There is a similar texture to snow dyeing and I like how the colors from the other layers sneak into each other fabrics without over powering the main color combinations.

parfait8parfait7parfait6parfait10

Sunday, June 16, 2013

Curved Log Cabin

gail6

This is Gail’s Curved Log Cabin quilt and she asked me to quilt feathers, any kind of feathers.  I decided to do open feathers and have the ones on the beige fabric going clockwise and the ones in red fabric going counter clockwise. I matched the thread color so had a lot of thread changes as I would complete a section and then roll.gail5gail2

The sun finally decided to shine as we’ve had lot of rain this week but we really needed so I’m not complaining as it as been so dry here.

gail7gail4gail3